This guide shows how to create a to-do list in Excel using the built-in Insert > Checkbox feature.
What You Need
- Excel for Microsoft 365, Excel for Microsoft 365 for Mac, or Excel for the web
- A worksheet with space for your task list
Steps
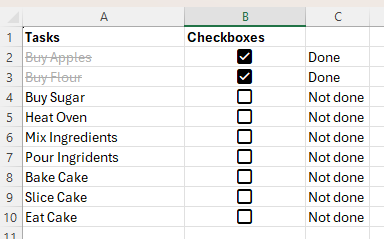
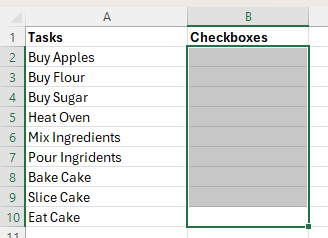
- Open Excel and enter your task names in a column, such as A2:A10
- Select the cells where you want the checkboxes, such as B2:B10
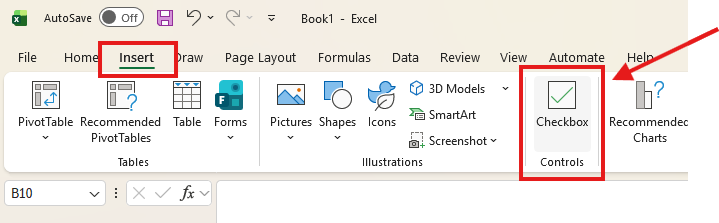
- Open the Insert menu and click Checkbox
- Excel will add a checkbox to each selected cell
- In the next column, add a status formula. For example, if your checkbox is in B2, enter this in C2:
=IF(B2,"Done","Not done")- Press Enter
- Copy the formula down for the rest of the list
- To cross out completed tasks, select the task cells, such as A2:A10
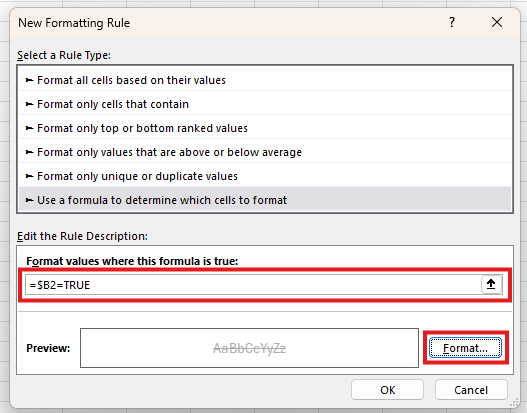
- Go to Home > Conditional Formatting > New Rule
- Select Use a formula to determine which cells to format
- Enter a formula that points to the first checkbox cell. For example:
=$B2=TRUE- Click Format.
- On the Font tab, tick Strikethrough. You can also choose a muted font colour if you want.
- Click OK, then click OK again
Notes
- The checkbox value sits in the cell, so you do not need a separate helper cell to access the checkbox value
- A checked box returns TRUE
- An unchecked box returns FALSE
- If Insert > Checkbox is not available, your Excel version may not support this newer checkbox feature
Troubleshooting
- If the formatting does not apply, check that the conditional formatting formula points to the correct checkbox column.
- If the status formula does not update, confirm the formula is referencing the checkbox cell, not the task text cell.
- If you want to remove the checkboxes later, select the checkbox cells and press Delete.