If you’re serious about optimising a WordPress website for speed, then you need to setup your website to serve the static content, such as images and css files, from a cookieless domain. This will speed up your page loads by reducing unnecessary traffic and distributing the traffic across more two addresses instead of one, working around the limit that browsers place on how many simultaneous requests can be made on each address.
On this pageJump to a section
As described by Yahoo!, when the browser requests a static image and sends cookies with the request, the server ignores the cookies. These cookies are unnecessary network traffic.
The steps below detail how to configure your WordPress install to serve static content from a cookieless domain.
Please note:
- This is by no means a simple process. You will need a good understanding of how website hosting works, including logging into your hosting account, configuring domain names, configuring the WordPress wp-config.php file and applying bulk changes to the database using phpMyAdmin.
- This can only work if you run your website from a www. address, e.g. www.itsupportguides.com — this allows you to separate the ‘cookie’ domain (www) and the cookieless domain (static).
- This process, specifically step 3, will involve bulk changes to your content using database tools. I highly suggest you create a backup of your WordPress database before continuing. Using phpMyAdmin this can be done using the ‘export’ option.
- Depending on the websites hosting environment it can take up to 24 hours for the new static sub-domain to start working. Typically it takes 5-15 minutes, but propagation of DNS changes can take up to 24 hours.
- CloudFlare users – you cannot satisfy the ‘cookieless domain’ criteria when running the website through CloudFlare – this is due to CloudFlare adding a “security cookie” to all content being served through their website. See CloudFlare website. This is because CloudFlare assign a cookie to the domain name (e.g. .itsupportguides.com) instead of the website address (e.g. www.itsupportguides.com)
- Google Analytics users – you will need to modify your Analytics code (also upgrading it to the latest version, if you haven’t already) and check that your Analytics configuration is setup correctly.
- HTTPS/HTTP – this is the same process regardless of if your website is served over HTTP or HTTPS.
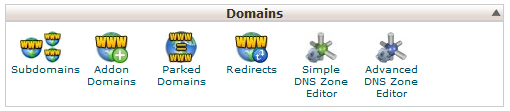
Step 1: Create a subdomain using cPanel for the static content
The steps below are for cPanel managed websites. The process may be different depending on the hosting environment for your website.
- Log into the cPanel for your website. The address is usually www.website.com/cpanel, and the username and password would have been provided by your host when you first joined.
- Under ‘Domains‘, click on the icon for ‘Subdomains’
- In the ‘Create a subdomain’ box enter static in the ‘Subdomains‘ field and in the ‘Document Root’ field enter the path to the wp-content folder, for example /public_html/wp-content
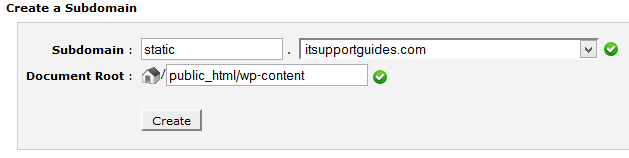
- Click on the ‘Create’ button and wait for confirmation that the subdomain has been created
- You will now be able to open static.domainname.com and see a blank page
- IMPORTANT: Test to make sure that your static address is loading – e.g. http://static.domainname.com (or https if you use it). DO NOT PROGRESS UNTIL THIS LOADS — you will see a blank page when it is working correctly.
Note: it takes time for new subdomains to be available. Typically it takes about 10 minutes, but can take up to 24 hours depending on how you access the Internet. If you’re having problems accessing the subdomain, try from another Internet connection or using an online tool such as Pingdom Tools.
Step 2: Configure WordPress
- Using your preferred method, for example FTP or through the cPanel, navigate to the root directory of your WordPress installation and edit wp-config.php
- Add the following lines to the top of the file, below the <?php
- Replace domainname with the domain name for your website
-
define("WP_CONTENT_URL", "http://static.domainname.com"); define("COOKIE_DOMAIN", "www.domainname.com"); define("WP_PLUGIN_URL", "http://static.domainname.com/plugins"); 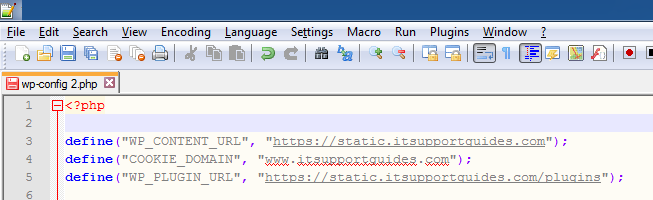
- Save the changes to wp-config.php.
Step 3: Update existing post content
Now WordPress is configured to serve the static content in wp-content through the static subdomain.
New images added to posts will now automatically use the static subdomain, however existing image paths need to be updated to use the static domain.
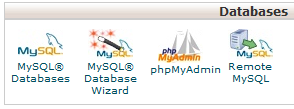
- Log into the cPanel again
- Under ‘Databases’, click on the icon for ‘phpMyAdmin’
- Expand the database for the WordPress installation and click on the posts table
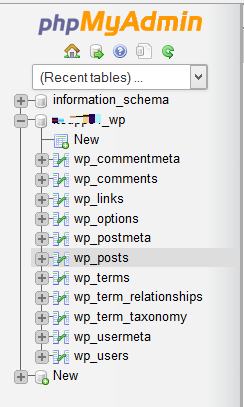
- Click on the ‘Inline’ link, then in the text box enter the following command
- Replace domainname with the domain name for your website
-
UPDATE wp_posts SET post_content = REPLACE(post_content,
 'http://www.domainname.com/wp-content/uploads/','http://static.domainname.com/uploads/')

- Click ‘Go’ to apply the changes
- From the WordPress admin, check a few existing posts to make sure images are loading from static.domainname.com
And you’re done – one step closer to WordPress speed perfection!
ADDITIONAL STEP: Google Analytics users
If your website uses Google Analytics you will need to modify the Google Analytics code used on your website to specify the cookie domain and check that the settings on the Google Analytics account has the same address.
Modifying the Analytics code
You will need to change the property in the Analytics code from ‘auto’ to the www. address for your website. e.g. for www.itsupportguides it would be
<script>
  (function(i,s,o,g,r,a,m){i['GoogleAnalyticsObject']=r;i[r]=i[r]||function(){
  (i[r].q=i[r].q||[]).push(arguments)},i[r].l=1*new Date();a=s.createElement(o),
  m=s.getElementsByTagName(o)[0];a.async=1;a.src=g;m.parentNode.insertBefore(a,m)
  })(window,document,'script','//www.google-analytics.com/analytics.js','ga');

  ga('create', 'UA-XXXXXXX-1', 'www.itsupportguides.com');
  ga('send', 'pageview');
  ga('set', 'displayFeaturesTask', null);

</script>
Configure the Analytics account
- Open https://analytics.google.com
- Open the website then go to the ‘Admin’ menu
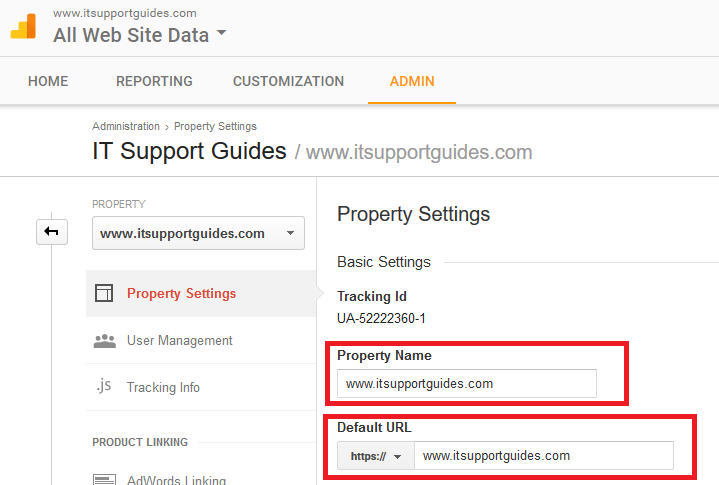
- under ‘Property’ -> ‘Property Settings’ make sure both the ‘Property Name’ and ‘Default URL’ has the www. address for your website
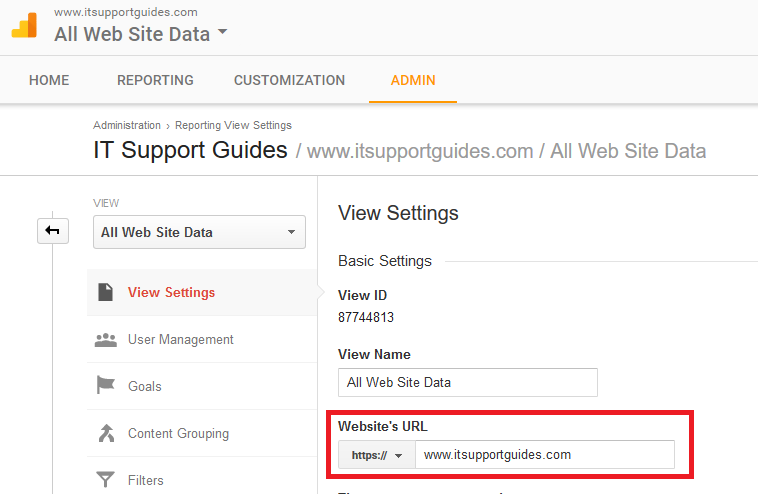
- For good measure, make the same change under ‘View’ -> ‘View Settings’ for ‘Website’s URL’
OPTIONAL: Additional step if your theme uses font awesome icons
If your theme uses font awesome for icons, such as a ‘home’ or ‘search’ icon – you will need to add the following to your .htaccess file to allow the icons to continue to work.
Replace the domain name with the domain name for your website.
## EXPIRES CACHING ##

# ------------------------------------------------------------------------------
# | CORS-enabled images |
# ------------------------------------------------------------------------------

        <FilesMatch "\.(cur|gif|ico|jpe?g|png|svgz?|webp)$">
            SetEnvIf Origin ":" IS_CORS
            Header set Access-Control-Allow-Origin "http://www.domainname.com" env=IS_CORS
        </FilesMatch>

# ------------------------------------------------------------------------------
# | Web fonts access |
# ------------------------------------------------------------------------------

# Allow access from all domains for web fonts

    <FilesMatch "\.(eot|otf|ttc|ttf|woff)$">
        Header set Access-Control-Allow-Origin "http://www.domainname.com"
    </FilesMatch>
Help! My website still isn’t passing the cookieless domain test
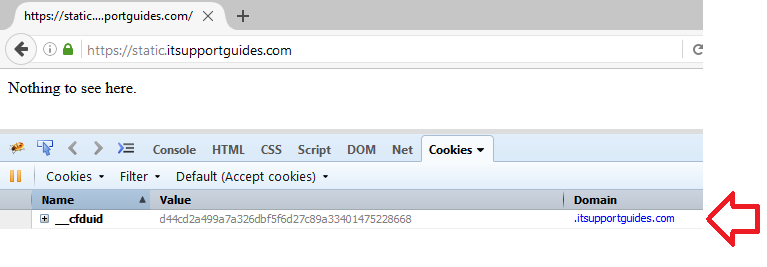
This is where things can get complicated – you now need to use a browser debugging tool to load a resource (e.g. an image or a html page) from the static domain and check through each of the cookies that are coming through with the resource.
For each cookie you will need to fix why they’re coming into the static domain.
For this I prefer to use Firefox and Firebug.
Using Firefox and Firebug – I’ve loaded the resource, opened Firebug then the Cookies tab.
From here you can see a list of the cookies that loaded on the static domain (note – I had to completely clear my browsers cache, even when using ‘private browsing’ to make this 100% accurate).
This example shows the CloudFlare security cookie – which can not be removed without disconnecting the website from CloudFlare.
I followed the instructions then found out it won’t work on my website because I don’t use www. How can I reverse the sql query?
I followed your tutorial for my new blog.
After modifying the sub-domain, Wp-config.php, and database (wp_posts)
my blog image urls are still https://mydomain.com/wp-con.. and not https://static.mydomain.com/up..
Any idea what I missed?
Hi… what about the existing content do we need to move all content static subdomain
Hi, I can’t find the document root option