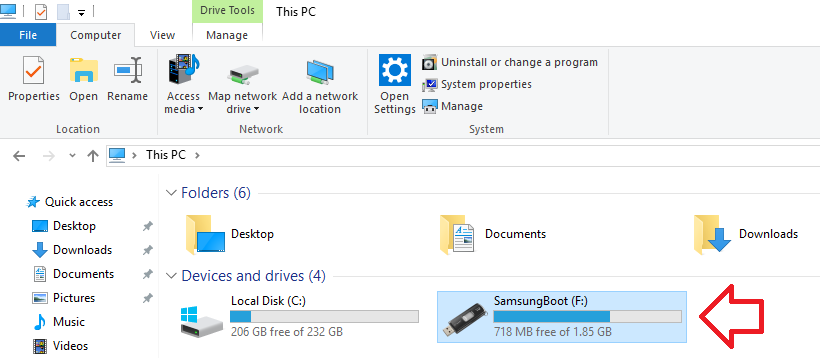
CAUTION: The steps below will completely wipe the data from the USB drive you select. Make sure you choose the correct drive and backup any files on the drive you may need to keep. For example, this USB drive is F:
On this pageJump to a section
METHOD 1: Using the cipher command line tool
cipher is a built-in command line tool in the Windows operating system that can be used to encrypt or decrypt data on drives.
It can be used to securely erase the FREE SPACE on a USB drive. Note – this is FREE SPACE only – if you want to erase the entire drive you must first format the drive so that it ALL free space.
The free space is overwritten three times:
- with a series of 0’s
- with a series of 255’s
- with a series of random numbers
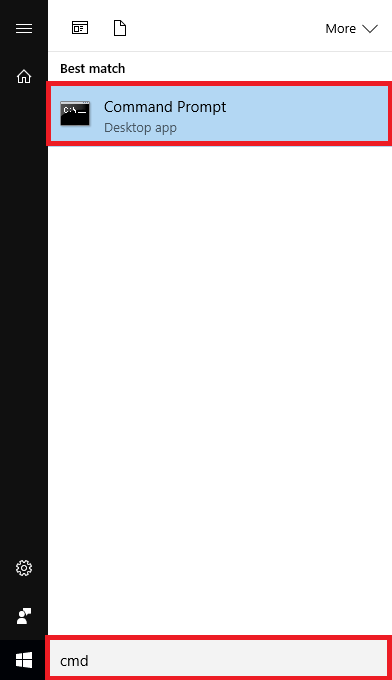
- Click on the Windows button at the bottom left of the screen, type “cmd’ and when it appears in the list click on “Command Prompt”
- Enter the following command making sure to replace X with the drive letter you want to erase
-
cipher /w:X:\

METHOD 2: Using the diskpart command line tool
diskpart is a built-in command line tool in the Windows operating system that is normally used to manage drives, partitions and mappings (partitions to letters) .
It can also be used to erase a USB drive by removing all existing partitions and writing a series of o’s.
- Click on the Windows button at the bottom left of the screen, type “cmd’ and when it appears in the list click on “Command Prompt”
- Enter the following command to start diskpart
-
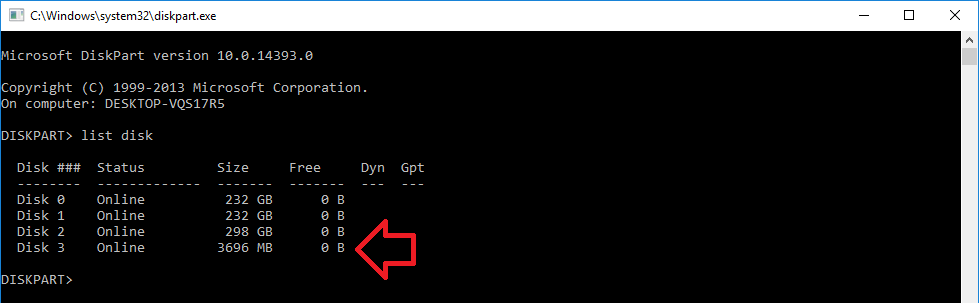
diskpart
- The diskpart program will load, once it’s ready you will see “DISKPART>” at the command prompt.
- Now enter
-
list disk
- This will list all drives connected to the computer, each represented by a number (1, 2, 3 etc) – determine which is the USB drive by the amount of space. In this case it is Disk 3 but it may be different for your computer.
- Enter in the following command, making sure to replace # with the number of your drive from above
-
select disk #
- The screen will display “Disk # is now the selected disk”. Now enter
-
clean
- The wiping process will now start and may take several minutes to complete – depending on the size of the drive. When finished you will have an empty USB drive ready to reformat.
OPTIONAL STEPS: Format drive using diskpart
If you want to reformat the drive (assign a partition type and drive letter) you can do this using diskpart by entering the following commands.
CREATE PARTITION PRIMARY
SELECT PARTITION 1
ACTIVE
FORMAT FS=FAT32 QUICK
NOTE: replace FAT32 with NTFS if you would prefer to use the NTFS. See
If you’re not sure which is right for you – check out FAT32 vs NTFS – how to pick the right format for your USB drive.
METHOD 3: Using Eraser (third-party software)
Eraser is a free program that is recommended by the creators of DBAN (a bootable hard drive erasing tool).
- Download Eraser
- Install and run
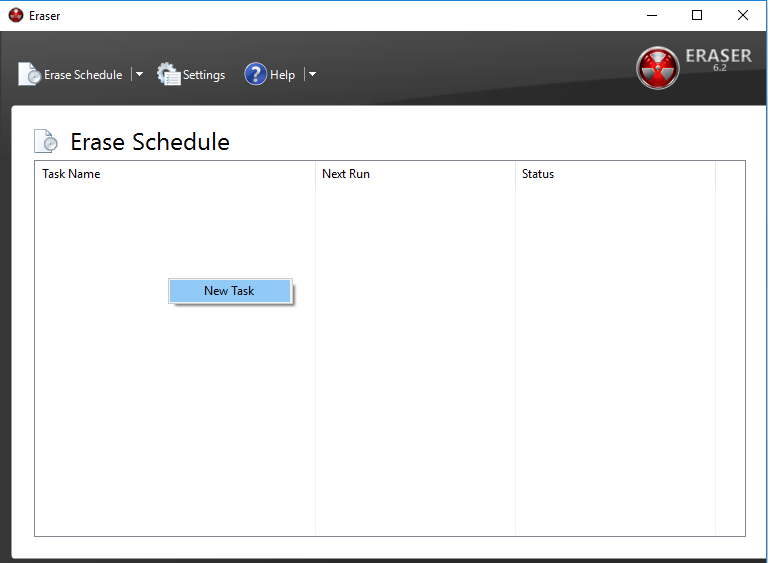
- Right-click in the middle area and choose ‘New Task’
- Under ‘Task Type’ choose ‘Run Immediately’
- Click on the ‘Add Data’ button
- Under ‘Target Type’ choose ‘Drive/Partition’
- Then from the list choose the drive you want to erase completely
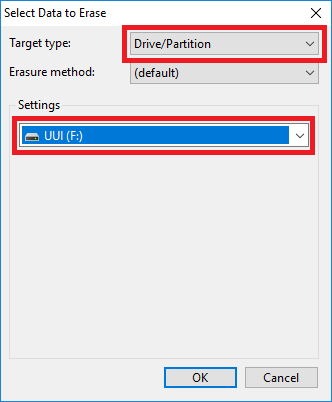
- Optional: you can also choose the erase algorithm using ‘Erasure method’ – but I would only do this if I knew 100% what and why.
- Click ‘OK’ to save the changes
- The task should now look something like this

- Click ‘OK’ to save the changes
- Eraser will now start wiping the drive – it may take awhile depending on the size of the drive.
